


This tutorial assumes no previous knowledge of programming, robotics, hardware, or Imagine.
Robotnačka is a robot that lives on a paper or whiteboard.
|
| And if you give it a pen, |
| it can move and draw: | |
At the end of this tutorial, we give you detailed instructions for getting your computer ready for Robotnačka. For now, we assume it already is.
Start Imagine by clicking on Imagine shortcut (why shortcut?).
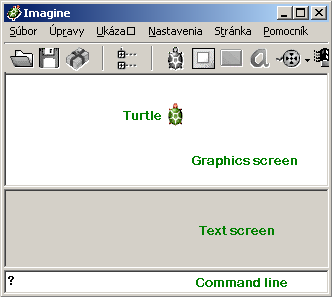
What you see now is the Imagine Logo environment. It is a full programming language with many features. Even very complex professional applications can be programmed in it, but it is very easy to start using it also for a complete beginner.
|
Before we start with the robot, we will play a very little bit with the turtle on the screen.
It is now ready and listening for your commands (why I do not see any turtle?).
Now try to type the following into the command line: repeat 5 [fd 50 rt 360/5] 
fd N - moves the turtle forward by N steps Can you try to draw other interesting pictures on your own? |
Robotnacka is able to learn complex commands. For example, to draw a little house, the turtle can first draw a square and then the roof:
repeat 4 [rt 90 fd 70] rt 30 fd 70 rt 120 fd 70 |
 |
to house
  repeat 4 [rt 90 fd 70]
  rt 30 fd 70 rt 120 fd 70
end
Now when we clear the graphics screen with cs command, and say house, guess what will happen?
If we want to draw houses of different sizes, we can add the house procedure an argument:
to house :size
  repeat 4 [rt 90 fd :size]
  rt 30 fd :size rt 120 fd :size
end
And now we can say "cs house 30" or "cs house 100". If you want to edit the house procedure again, click F4 key and you will see the turtle's memory. Go into the list of procedures and double click house. When finished with changes, click OK (use the keys F11 - F12 to open and close the editor if your computer mouse is far from your keyboard).
But now we want to see the robot working!
Insert a pen and turn it on! You should hear a lot of short beeps, and when the robot is happy, it will start making a short beep every 10 seconds.
If you have connected to your robot from your computer before (which you probably did, if you followed the instructions at the end of this tutorial), you can load the robot.imt program:
load "robot.imtThis will connect to the robot, and the robot should beep to indicate that, if it was not connected already. All previous turtles you created will be erased, and a new robotic turtle will appear on the screen. Everything looks the same as before, but from now on, the robot is connected to the turtle and follows its movements! Remember, however, that robot's pen is now up. If you want to start drawing, you need to say pd (penDown). To stop drawing, say pu (penUp).
Note that robot.imt created a special object robotPort. This is the robot.ocx component, which allows you to achieve more than drawing straight lines and making turns at the spot. Look inside the Basic Robot Component Tutorial to read more.
Before you start creating your own applications, we recommend you to try the SpiralWorld, and FreeHand projects, and if you have a Joystick connected to your computer, try the Joystick project as well. You will find links to these projects from the Robotnacka software project page and they are included on the CD you got with Robotnacka.
Finally, we want to make a note that everything mentioned here will work with the robots in virtual robotics laboratory too. All you need to do is a) be connected to Internet, b) follow the installation instructions bellow, skipping the points 6-9. In point 10, specify the IP-address of the laboratory instead of the name of virtual serial port. The IP-address is currently 147.175.125.30.